0

Recipe #14: Paddy’s Rancheros

I’ve always admired the way that bachelormen, or indeed most men in a situation not overseen by a woman, are able to streamline their eating habits. For instance, Warren Buffet stops at a McDonalds Drive Thru for his breakfast every morning. He bases his choice of a bacon, egg and cheese biscuit ($3.17) or a sausage McMuffin with egg and cheese ($2.95) on how the market’s doing that day. I know another, arguably healthier (although probably not wealthier) man who eats two Weetbix for breakfast every single morning of his life. He doesn’t bother with another option. Ever.

In contrast, not only do I never know what I’m going to have for breakfast, but I seldom remember to eat it before noon. This makes it difficult to decide whether to eat something breakfast-like, or to admit defeat and try to work out what to eat for lunch instead. The overwhelming concatenation of decision-making usually causes me to abandon all feeding efforts until around 4pm, when my stomach starts sending polite memos that it doesn’t care which meal is served, as long as it is served soon.

Which all goes to explain why I’m so enormously grateful to my friend Paddy, the clever bachelorman who gave me this recipe. Because you can serve beans rancheros as breakfast, lunch, or dinner – no matter what time you get around to eating them. And, with the unfortunate exception of the bread, the ingredients are all things you can keep in your fridge, freezer and pantry for several weeks. As long as you remember to keep a few basics in stock, Paddy’s Rancheros will always have your back.

There are two more very good reasons this meal has become my bachelorwoman go-to: it’s super easy to make, and it’s ridiculously tasty. Maybe too tasty, actually. Because, according to Paddy, you’re not really supposed to be able to eat the entire pan by yourself in one sitting. But then, he probably eats breakfast.

Ingredients

  • 1 packet chopped bacon bits (250g)
  • 1 onion
  • 1 or 2 cloves of fresh garlic
  • A gurgle of olive oil
  • 1 tin of red kidney beans, drained
  • 1 tin of tomatoes (I like chopped, Paddy prefers whole)
  • 2 bay leaves
  • 1/2 – 1 tsp smoked (or normal) chilli flakes (depending on how hot you want it)
  • 1 tsp smoked (or normal) paprika
  • 1 tsp ground coriander
  • 1 tsp ground cumin
  • 2 or 3 eggs
  • A couple of large handfuls of grated cheese (mature white cheddar is a good choice)
  • A loaf of Pugliese bread from The Real Bread Company in Muizenberg – The Official Bread of Paddy’s Rancheros
  • Some butter

What to do

  • Chop your onion and garlic and chuck them in an oven-proof stainless steel frying pan with the olive oil and bacon bits. (By oven proof, I mean don’t use one with a plastic handle as it might melt later.)
  • Fry the bacon, onion and garlic for a bit until they’re not raw.
  • Dump all the other ingredients in the pan, except for the eggs and cheese, and then simmer, stirring occasionally, until the sauce thickens and your stomach sends memos marked ‘URGENT’.
  • Turn your oven to 180 Celsius (360 for you Fahrenheit Freaks) and let it heat up, then crack the eggs on top of the bean mixture and sprinkle the cheese over it all.
  • Put the whole pan in the oven for 5 to 10 minutes until the cheese is bubbling nicely. Remove the pan from the oven. Use oven gloves.
  • Toast a couple of slices of your Pugliese bread, butter it, and put it on a plate topped with a wodge of rancheros.
  • Try not to eat entire pan of rancheros in one sitting. It may help to invite a friend over.

Time taken

About 15 minutes of active preparation, plus a respectable amount of time for simmering – say 30 minutes. Total, around 45 minutes.

Dishes dirtied

  • 1 frying pang*
  • 1 knife
  • 1 chopping bored*
  • 1 wooden spoon
  • 1 cheese greater*
  • 1 tin opener

*Not typos. Me pretending to be an Ethiopian menu.

0

Recipe #13: Split pea and smoked ham soup

It’s not very often that I receive a follow-up phone call to demand the recipe of something I served for dinner. In fact, this is the first time it’s ever happened. And when that recipe is for something as prosaic as soup, you realise you may have, accidentally, cooked something quite decent. So, after three years of neglecting this blog, here is recipe number 13, especially for my friend Squilly. It’s best served around a fire with wine and home-made garlic pizza bread that was supposed to be light and fluffy, but turned out flat and crunchy instead.

I scrolled through lank photos of other people’s pea soup to find a match, and eventually settled for something that might be from Shutterstock. If you sprinkle your ham bits, a few unblended unsplit peas, plus some mint over this recipe, and lovingly bathe it in natural light, it will totally look exactly like this.

Ingredients

  • Most of a 500g packet of split peas (In South Africa, you’ll find these in the same aisle as the samp and beans)
  • 1 brown onion, finely chopped
  • 4 garlic cloves, chopped
  • A large glug of olive oil
  • 2 Woolies chicken stock cubes (none of that Imana stuff, plz)
  • About 1 litre water, depending on how liquidy you like your soup
  • About 500g smoked ham. (3 or 4 kassler chops would work). I used smoked ham that I got from the farmer’s market in Sedgefield and then flew back to Cape Town with in my carry on luggage. But you don’t need to go to such lengths. Don’t chop the meat up yet.
  • 1 potato, peeled and diced
  • A cup of frozen peas

I prefer these peas

What to do

  • Soak the split peas for a couple of hours before getting started. This will save on cooking time later.
  • Fry the onion and garlic in the olive oil and brown the pork on a highish heat.
  • Add the split peas, water and stock cubes and leave to simmer for, like, a while. (I dunno – 40 minutes?)
  • Add the potato because you just realised it might be nice to have potato in it and you have a potato.
  • About 15 minutes before you plan to serve the soup, dump in the frozen peas. These will give the soup a nice bright green colour.
  • 5 minutes before serving, fish out all the pork and blend the soup into greeny creaminess with an oopah-zooter. (I call stick blenders oopah-zooters. ‘Stick blender’ is such a lame name.)
  • Chop the pork into little cubes while swearing about burning your fingers doing so.
  • Throw pork cubes back into soup, stir, and serve.
  • Boom.

Time taken

  • Preparation: Less than 15 minutes
  • Cooking time: About an hour
  • Post-cooking blending of soup and chunking of meat: 5 mins

Dishes dirtied

  • 1 large pot
  • 1 wooden spoon
  • 1 stick blender
  • 1 chopping board
  • 1 knife
  • 1 potato peeler


0

Recipe #12: Totally sugar-free alcoholic oats

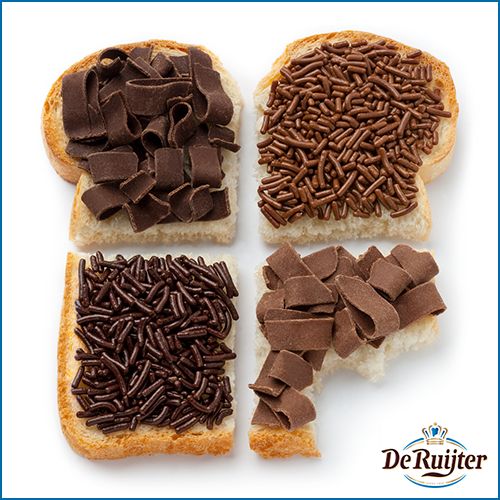
A weird, but truly wonderful feature of living the Western world is that we like to eat pudding first thing in the morning. This is in contrast to the east, where a nice basket of dim sum or a large bowl of rice is considered the correct way to start your day. On the Continent, there’s no pretence that breakfast is anything but last night’s slightly-delayed dessert course:

Can anyone say 'boterham met hagelslag'?  I can NOT wait to get to Amsterdam so I can nosh this for breakfast every day!

Can anyone say ‘boterham met hagelslag’? I can NOT wait to get to Amsterdam so I can nosh this for breakfast every day again!

But for some reason, less civilised nations prefer to kid themselves that breakfast is somehow supposed to be healthy:

Mmmmm, squirrel poo with fruit. Yum yum.

I think the bran farmers heard about hagelslag and totally loved the whole ‘brown sprinkly things for breakfast’ concept, but ended up making squirrel poo instead. Which is quite appropriate, when you think about it. (Sorry.)

Worst of all, it’s considered démodé to include alcohol in any meal served earlier than, say, tennish.

Because of this, I’ve been avoiding breakfast for several months, as anything that remotely resembles good behaviour is anathema to me. And then I remembered whiskey oats.

Many years ago, in the snowy mountains of Lesotho, I was introduced to the proper way to prepare oats: cooked in milk, with a small pat of butter and a large dollop of whiskey (added after cooking obviously. You don’t want to destroy the alcohol.)

I thought I’d add a few extra items to this brilliant basic recipe today – mainly because I decided to bake some fancy bread several months ago and the ingredients have been clogging up my cupboard ever since.

Ingredients

(Listed in order of chucking into bowl)
  • 1/2 cup of Jungle Oats. These were originally bought for my hamster Mervyn, but since my cat Hunter got hold of him, eating the oats is up to me.
  • Pinch of salt. I use that pink stuff, because I’m posh like that, and also I eat so much salt that I need to tell myself that it’s healthy salt. (Although I do worry that if we all use pink salt, Mt Everest will shrink. But then again, that would make it easier to climb. Not that I was thinking of climbing it.)
  • A handful of dried cranberries. You could use raisins, but that would be a bit economy class.
  • Some warmish water from the kettle that’s left over from making your coffee. Use just enough to cover the oats. Don’t go crazy with that water – it’s tasteless and has no nutritional value.
  • Some milk. Not low fat. (I mean, what is the point?)
  • A banana. If you’re lucky, you’ll have bought a bunch of bananas, kept them in the fridge until their skins are black and hideous looking, and then discovered they’re at the perfect mushiness to mash. With your fingers, if you’re channeling your inner child. If you’ve just got normal bananas, slice one. This would be the perfect opportunity to use your banana slicer, if you have one.
  • A little pat of butter. This is optional. If you already put butter in your coffee, as I do, butter in your porridge too might be overkill.
  • Some pecan nuts. Or walnuts. I don’t care. Just not peanuts, okay? (Pistachios are probably not going to work either.)
  • Some whiskey. With an e, because you should obviously use Jammies, seeing as you’re still in yours. Don’t you dare use a single malt. I don’t care how extravagant you’re feeling, that stuff is not made for you to put in your porridge.
  • The teensiest half teaspoon of honey, for its miraculous anti-bacterial, anti-fungal, anti-cancer, anti-minnesotan-dentist properties.

What to do

  • Put oats in bowl. Put salt in bowl. Put dried cranberries in bowl. Put water in bowl. Put bowl in microwave.
  • Microwave for a minute(ish) until water is no longer watery.
  • Put enough milk in bowl to get oats to loosen up.
  • Put bowl back in microwave until milk is no longer milky.
  • Add mushed up (or sliced) banana and a bit more milk.
  • Put bowl back in microwave until you think the banana has warmed up. Cool bananas are not what we want here.
  • Sprinkle with pecan nuts, honey and a dollop of whiskey. Stir and serve.
  • Congratulate yourself on incorporating alcohol into your morning meal, while simultaneously avoiding anything that could be labelled sugar.
Seriously people, it's a frikkin bowl of oats with some nuts on top. You don't need a picture to work out what that looks like.

Seriously people, it’s a frikkin bowl of oats with some nuts on top. You don’t need a picture to work out what that looks like.

Time taken

  • Approximately 3 minutes 47 seconds. Includes rummaging in cupboard for cranberries.

Dishes dirtied

  • One bowl
  • One spoon
  • One banana slicer – optional. (I don’t use one myself, as it’s had mixed reviews, although I might buy one if I get another hamster. I’ve included some reviews, to help you decide for yourself.)

Screen Shot 2015-08-06 at 2.48.31 PMScreen Shot 2015-08-06 at 2.49.00 PM

Screen Shot 2015-08-06 at 3.22.30 PM

Screen Shot 2015-08-06 at 2.48.43 PM

Screen Shot 2015-08-06 at 2.41.34 PM Screen Shot 2015-08-06 at 2.42.21 PM

The Hutzler 571 Banana Slicer. It's a decision you have to make for yourself.

The Hutzler 571 Banana Slicer. It’s a decision you have to make for yourself.

1

Recipe #11: Summer Bread-and-Butter Pudding

IMG_5359_Snapseed

This is one of those annoying recipes where the person really just wants to boast about wonderful fresh ingredients that you, stuck in the city, with barely time to dash to the 24-hour Woolies at the Engen, are not in any position to acquire. Since that’s usually me – and is going to be me again next week – I understand exactly how irritating that is. And I’m going to do it anyway.

Today’s fresh, unattainable ingredients are berries, handpicked from a French country garden with the help of two charming little children.

First, find your raspberry bushes. These will be hidden like ruby fields down at the bottom of the garden where the grass is long. Some of them may even be perilously close to nettles.

IMG_5325_Snapseed

Raspberry bush things look very much like weeds, except they have raspberries attached to them.

Teach charming children what colour a ripe raspberry is (not green) and how to find them without getting stung by nettles. Fill a bowl with raspberries before proceeding to search and strip the garden of red currants, gooseberries, wild strawberries and even a few cultivated strawberries, hot from the sun.

Is this picture helpful? No. Am I going to use it anyway? You betcha.

Is this picture helpful? No. Am I going to use it anyway? You betcha.

Leave some of the raspberries for later so that your niece can sit in the tree house and order you and your nephew to bring her more in a most charming manner.

It is important that your berries are rigorously quality tested.

It is important that your berries are rigorously quality tested.

Then, before you pass out from sunstroke or cheap French wine, make this pudding, which is fortunately easy enough to bake even if you have had too much sun and wine. The only culinary skill you’re going to need is the ability to butter bread. You can manage that, right?

Ingredients

  • A large bowl of fresh mixed red berries, handpicked in a French country garden. If you can’t get these, frozen berries will have to do.
  • Sliced baguette, brioche or bread. Or all three. This kind of pudding is not fussy about the bready stuff that goes into it.
  • Butter. It’s easier to spread if it’s soft. (Sometimes I like to state the obvious because sometimes the obvious stuff is actually helpful to me.)
  • 3 eggs
  • 500 ml milk
  • About 1 cup sugar
  • Ground nutmeg and cinnamon
  • Fresh vanilla, handpicked on your last exotic holiday in Madagascar… (Nah, just joking. Haven’t been there in years.)

What to do

  • Rinse off the berries (or defrost if frozen). Put in a bowl and sprinkle 1/4 cup sugar over them and leave for maybe half an hour, or until you remember you’re supposed to be making pudding (you will be reminded by your niece).
  • Grease a largeish oven dish and butter your bread stuffs on one side. Put one layer in the dish butter side up and then cover with the berries. Put another layer over the berries, also butter side up.
  • Sprinkle lightly with nutmeg and cinnamon.
  • Beat the eggs with 1/2 cup sugar and add the milk (slightly warmed) and vanilla. Pour it all over the bread and berries. Squish everything down a bit with your hands (it’s a good idea to wash your hands, especially if anyone’s watching you.)
  • Sprinkle with a bit more sugar and leave to stand for about half an hour or until you remember you’re still supposed to be making pudding (your niece and nephew will remind you).
  • Heat the oven to 180 C, trying to ignore alarming rocket noise French ovens make. Bake the pudding for 45 minutes, or until rocket noise can no longer be ignored.
  • Serve to impressed adults with ice cream and more French wine long after nephew and niece have been put to bed (but remember to keep a portion aside for them for tomorrow).

IMG_5358_Snapseed

Time taken

  • Berry picking: depends on how much help you have and how many you eat while picking. (A good nephew and niece will eat only 5% of total pickings.)
  • Preparation: 10 minutes (excluding standing time of 30 mins for fruit and 30 mins for pudding)
  • Cooking: 45 minutes

Dishes dirtied

  • 1 dish
  • 1 bowl
  • 1 bread knife
  • 1 butter knife
  • 1 bread board
  • 1 fork/whisk
  • 1 spoon
1

Recipe #10: No-fry Spring Rolls

IMG_4740_Snapseed

I’ve always loved spring rolls, but didn’t think I could make them myself. (I thought the same about ice cream until recently.) I also don’t like the idea of deep-frying. All that hot oil – scary! Phyllo pastry is the perfect substitute for spring roll wrappers and comes out just as well when baked. This recipe can be used for a light but satisfying lunch, or as a starter for a dinner party. You can prepare the spring rolls a day in advance and keep in the fridge until you’re ready to bake them.

Ingredients

  • 1 roll phyllo pastry
  • 2-minute noodles (Thai sweet chilli flavour)
  • 1 tablespoon vegetable oil, for frying
  • 1 packet (500g) frozen stir fry vegetables
  • 2 tsp PnP crushed garlic, ginger and dhania paste
  • Sesame seeds for sprinkling

What to do

  • Defrost a roll of phyllo pastry (usually the box contains 2 rolls). If, like me, you forgot to leave it in the fridge overnight as recommended, you can defrost it in less than an hour by putting it in a watertight freezer bag and submerging it in cold water.
  • Preheat oven to 180 C.
  • Prepare the 2-minute noodles as per the instructions on packaging.
  • Heat a wok with some vegetable oil and add the vegetables and the PnP paste. Stir-fry for 3-4 minutes, add noodles and sprinkle the Thai seasoning. Stir-fry for another minute or two, then remove from heat and let cool.

IMG_4722_Snapseed

  • In the meantime, cover a counter top with a large square of cling film. (You’ll use this as your pastry preparation surface.)
  • Cut the roll of phyllo pastry in half so that you have two shorter rolls. Then unroll one of the rolls and separate into two sheets of 3 layers each. Cut each sheet into thirds.
  • Place a couple of tablespoons of the stir-fry mixture lengthways on each of the mini-sheets. Tuck the ends up and roll into little tubes. Brush with canola/sunflower oil and sprinkle with sesame seeds.

IMG_4726_Snapseed

  • Repeat until you’ve used up all your pastry and have 12 good-sized spring rolls.
  • Bake on a baking sheet at 180 degrees Celsius for 20 minutes and serve piping-hot with a dipping sauce of your choice.

Cunning Plan

Use any left over phyllo pastry to make chocolate banana spring rolls. Mash a ripe banana, add a couple of tablespoons of Nutella, a handfull of chopped nuts and another handful of chopped dark chocolate. Use this filling to make mini spring rolls (about half the size of the veggie ones) and serve hot as a dessert.

Time taken

  • Preparation: 25 minutes
  • Baking: 20 minutes
0

Recipe #9: Roast Pork Belly with Apple and Leek Sauce

IMG_4744_Snapseed

A couple of weeks ago, I went to a birthday party for a Viking Chiro, where much amazing food was served, along with large quantities of schnapps. The most coveted morsels, however, were the fluffy curls of crackling that accompanied the Danish pork roasts. They vanished within minutes, to much contented crunching.

I don’t know about you, but I’d never before mastered the art of crispy crackling. All my previous pork roasts have come with a rubbery outer layer that provides an experience somewhat like chewing glutinous, salty tyres. Imagine my glee when the Viking Chiro’s fabulous wife explained to me (while following the wrong BMW to the ice-skating rink) how easily properly crunchy crackling could be achieved  She told me (while making a sudden U-turn and hot-footing it back towards the N1) that you simply roast your roll of pork in 4cm of water with an onion for about an hour and a half.

A few hours later (with a bruise on my behind and slightly wet jeans) I went in search of rolled pork so that I too could make a Viking roast. Alas, there was none to be found at the supermarket. After 15 minutes of prowling up and down the meat section in disbelief, I found one smallish pork belly hiding behind a few chops. The problem was, the belly was quite flat – not the type of roast my friend had described to me at all. Nevertheless, I bought it, just in case I couldn’t be bothered to go to another supermarket. Groceries are all very well, but I draw the line at doing them twice in one day.

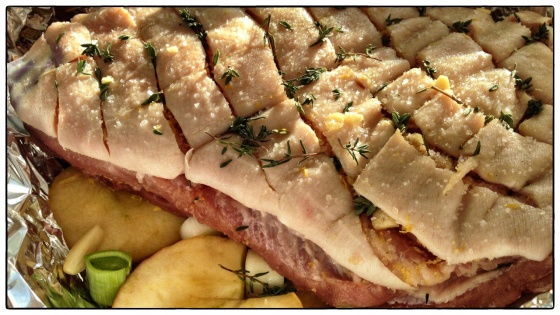
Since I’d correctly estimated my laziness levels, I now had to figure out another way of roasting my pork and crisping my crackling. All the recipes for pork belly I found online said that, at some point, you had to put the temperature of the oven up. However, they disagreed about the temperature (anything from 180 C to 280 C), how long to do it for, and when to do it (either right at the start or right at the end). I decided to be safe and use the hottest oven setting (280 C) for 20 minutes both at the start and finish.

The only thing the recipes did agree on was that you should roast pork belly on top of something. It didn’t sound like it mattered much what: onions, garlic, apples, ferrets (no, sorry, I made that last one up). Since I had lots of apples and a few leeks left over from the chicken pie, I used those. I’m afraid I cannot give you accurate oven times because our dinner guests were late and I kept faffing around, taking the roast out of the oven, putting it in again, roasting the veggies (on a separate tray) at the same time, etc, etc. I did get the feeling, however, that as long as the tinfoil is snugly tucked around the roast, and the crackling hasn’t actually turned black, it would be hard to overcook this.

In the end it turned out perfectly: tasty and tender and with the crackliest crackling I could desire. Our female dinner guest even exclaimed, “Do you work?!”, which, as we all know, is the highest possible praise.

Ingredients

  • 1kg + pork belly roast
  • 3 apples (any kind)
  • 2 or 3 leeks
  • 4 or 5 cloves of garlic
  • Zest of 1 lemon
  • Fresh thyme

What to do

  • Preheat your oven to its highest temperature.
  • Line a small roasting dish with heavy foil.
  • Slice your apples, leeks and 3 or 4 cloves of garlic and layer the bottom of dish with them.

IMG_4742_Snapseed

  • Scour your pork skin as best you can (it takes elbow grease and a sharp knife), taking care not to slice all the way through to the flesh.
My rather clumsy attempt at diagonal scouring.

My rather clumsy attempt at diagonal scouring.

  • Rub the sea salt, a clove of chopped garlic, the lemon zest and thyme all over the surface of the pork skin and into the cracks.

IMG_4746_Snapseed

  • Lay the belly on top of the apples and leeks and tuck the foil around it snugly so that just the skin is exposed.
  • Put in the oven for about 20 minutes on the high temperature to start crisping the skin. Turn the temperature down to 160 C and roast for at least another half an hour for every 500g (you can make this longer, depending on how well you like your pork done).
  • Just before serving, turn the oven to its highest setting again and leave for another 15-20 minutes, keeping an eye on the crackling to make sure it doesn’t burn (a little bit of black is okay though).
IMG_4747_Snapseed

This is the pork belly just after the initial exposure to the furnace. It got even crispier after the second blast at the end, but I felt it would be awkward to photograph the roast in front of guests.

  • Remove from foil and leave to stand on a dish for 10 minutes before carving.
  • In the meantime, carefully lift the foil out of the dish and pour the apple, leek and pork juice mixture into a jug. Blend until smooth and decant into a gravy tureen to serve with the roast.

Wine pairing suggestion

IMG_4748_Snapseed

Jacques Bruére Brut Reserve

Obviously you need to celebrate your crispy crackling with some sparkly bubbly! Thanks to our dinner guests, we celebrated in 5-star style. Follow it up with the Vrede en Lust Viognier, which is rich and full enough to support the flavours of the pork belly.

Time taken

  • Preparation: 20 minutes (mostly spent trying to scour the skin).
  • Cooking: anywhere between 2 and 4 hours, depending on the size of your roast and the hotness of your oven. Sorry. I did warn you.

Dishes dirtied

  • 1 chopping board
  • 1 roasting pan
  • 1 knife
  • 1 grater
  • 1 stick blender
  • 1 jug
1

Recipe #8: Chicken, Leek and Mushroom Pie

IMG_4716_Snapseed

“Don’t ever change anything about this recipe” – The boyfriend, on eating this pie

Chicken is the ultimate pie-filling, yet it’s almost impossible to buy a good chicken pie. If the pastry’s not stodgy, the filling is niggardly:  white sauce with stringy bits of salty bird floating around in a lonely sort of way. Fortunately it’s so easy to make your own!

The secret to this chicken pie’s simplicity is to cheat. There’s nothing wrong with the pre-roasted birds sold at the supermarkets, nor with pre-rolled frozen pastry. Use both, and your biggest headache is going to be chunking your chicken without eating half of it. (My chickens always mysteriously lose both their legs and wings.)

Ingredients

  • 1 medium to large roast or barbeque chicken from Woolies, Pick ‘n Pay or similar.
  • 1 roll frozen puff pastry (‘Today’ brand is good)
  • 4 rashers streaky bacon
  • 4 leeks
  • 1 punnet button mushrooms
  • 1/2 packet powdered cream of mushroom soup (not cup-a-soup – the big packets)
  • 1/2 cup sour cream
  • 1/2 cup dry white wine
  • Salt and pepper to taste
  • A bit of butter
  • Milk to brush the pastry with
While cooking this pie, it is recommended that you drink cider.

While cooking this pie, it is recommended that you drink cider.

What to do

  • Remember to defrost your pastry in the fridge overnight. If you forget (I always do), you can defrost it in under an hour by putting it in a bowl of cold tap water. (Just make sure the packaging is waterproof, or seal it in a ziplock bag.)
  • Preheat the oven to 180 C
  • Chunk your chicken. As in, remove all the flesh from the carcass (you choose whether to keep the skin. I do), debone and then chop into good-sized chunks.
  • Chop up your bacon, leeks and mushrooms and fry in a generous pat of butter.
My dad made me take this photo because he thought it looked nice.

My dad made me take this photo because he thought it looked nice.

  • When they’re fairly well done, add the sour cream, white wine and mushroom soup powder and stir well. Simmer for a few minutes to allow the sauce to thicken a bit. Salt and pepper to taste.
  • Put this in a good-size oven-proof dish, add the chicken and mix it all up nicely. Leave to cool a bit.
  • In the mean time, put a layer of cling film on your counter top to keep both clean and roll out your pastry so that it just fits the top of your dish. Place on top of the chicken mixture and trim off any excess. Use the trimmings to make decorations, if you’re so inclined. (Pastry is a bit like play-dough.)
IMG_4693_Snapseed

Pastry is a grown-up substitute for modelling clay

  • Brush with milk/egg and sprinkle with sesame seeds if you happen to have any.
  • Bake according to instructions on the pastry packet until golden brown.

IMG_4714_Snapseed

  • Leave to cool for about 10 minutes before serving with a green salad or mash and peas.
  • Leftovers will keep several days if refrigerated  When reheating, microwave for a minute or two first and then put in the oven at about 120 C for a few minutes to crisp up the pastry again.

Wine pairing suggestion

Knorhoek Sauvignon Blanc-Chenin Blanc

IMG_4689_Snapseed

While it’s a great idea to drink cider (especially one as good as Windermere) while cooking this pie, eating it requires white wine – preferably the one you used in the pie (a lesson I learned from the Coq Au Vin). A Sauv Blanc-Chenin blend is just the right combination of crisp and fruity. #Happiness

Time taken

  • Preparation: 20 minutes
  • Baking: 20-30 minutes

Dishes dirtied

  • 1 frying pan
  • 1 wooden spoon
  • 1 chopping board
  • 1 knife
  • 1 oven proof dish
2

Recipe #7: Traditional Gluhwein and Spice Biscuits

IMG_4666_Snapseed

When I was very young, we had the most ridiculous Christmasses. Every year, my family would fly to Switzerland. My grandparents would pick us up in a white Rover and drive us into the Alps, where we’d ski, build snowmen and ramble through the frost-sparkling woodlands. I was too young to drink, but nothing takes me back to those glorious days quite like the smell of hot spiced wine, or gluhwein. (Actually, the smell of snow works too, but it’s hard to find snow to smell in South Africa.)

Gluhwein has become quite popular in South Africa lately, but, as I discovered last Christmas, it’s still relatively unknown in California – which shows that in SA we are ahead of the curve in some things. This is my mother’s recipe for gluhwein, presumably passed down through generations of mountain-dwelling, snow-schussing Swiss ancestors. (The brandy is my own addition, however. There was a bottle in the cupboard that needed to be finished.)

Gluhwein recipe

Ingredients

  • 1 cup water
  • 1 cup sugar
  • 1 bottle red wine (3 cups, if you’re using box wine, which is what I did)
  • 2 tots of brandy (I used Oude Meester VSOB)
  • 2 lemons
  • 3 sticks of cinnamon
  • A handful of whole cloves
  • 2 teaspoons of mixed spice or 20 whole all spice

What to do

  • Put the water, sugar, cinnamon and mixed/all spice in a pot and heat for about 5 minutes until it reaches boiling point.
  • Meanwhile, slice the lemons and stud the slices with cloves.

IMG_4649_Snapseed

  • Take the pot off the heat, add the lemon slices and leave to stand for about half an hour. (You can make the biscuits in that time.)
  • Add the wine and heat very slowly until just before boiling point.
  • Serve with a ladle in heat-resistant glasses with handles or stems. You can choose to strain before serving, but I don’t bother.
  • This recipe only makes about 6 to 8 servings, so I’d double it if there are more than 2 or 3 of you.

IMG_4660_Snapseed

Cunning plan

Refrigerate leftovers overnight and serve chilled as cocktails, with one part soda water, one part gluhwein and plenty of ice. Yum!

The hot version is perfect for chilly nights, but the cold version is terrific on sunny afternoons!

The hot version is perfect for chilly nights, but the cold version is terrific on sunny afternoons!

Food pairing suggestion

IMG_4663_Snapseed

When I asked my mother what’s best to serve with gluhwein, she suggested spiced ginger biscuits and promised to send me her recipe for those too. Five minutes later, she realised that it was buried in boxes in the garage, so she’s spending all weekend looking for it. In the meantime, I went ahead and invented one.

Spice biscuits recipe

Ingredients

  • 1 cup sugar (brown or white, it doesn’t matter)
  • 1 cup self-raising flour
  • A chunk of butter (maybe around 1/2 or 1/3 cup? I can’t say for sure, I just plonked some in)
  • 1 egg yolk (save the white for an omelette or something)
  • 1 teaspoon mixed spice
  • 1 teaspoon ground ginger
  • 1/2 teaspoon nutmeg
  • 1/2 teaspoon cinnamon
  • 1/4 teaspoon bicarbonate of soda
  • Some raw almonds

What to do

  • Preheat the oven to 180 C
  • Put the sugar and butter in a bowl together. If the butter is hard, nuke it for a few seconds until it’s soft enough to blend with the sugar till it’s creamy.
  • Add the egg yolk and mix and then add the flour, spices and bicarb. Mix thorougly and squish together to form stiff little dough balls. Make them as small as possible – just large enough to put one almond on top of.
  • Bake for 15 minutes and leave to cool before serving.
IMG_4659_Snapseed

You have to make them tiny to start with because they spread out quite a lot.

Dishes dirtied:

  • 1 pot
  • 1 chopping board
  • 1 knife
  • 2 wooden spoons
  • 1 cup measure
  • 1 bowl
  • 1 baking tray

Time taken:

  • Gluhwein: 10 minutes to make, 30 minutes for syrup to stand
  • Biscuits: 10 minutes to make, 15 minutes to bake
0

Recipe #6: Russell’s Ratatouille

IMG_4633_Snapseed

Apart from the ability to quote from every episode of Blackadder and to read reams of very silly science fiction, my dad and I share a love of cooking simple, tasty food. In fact, my father (whose name is Russell) has even published* his recipes – or, as he calls them, Russipes.

*By ‘published’, I mean he has typed them up and printed them out for me.

One of my favourites is this ratatouille recipe. Dad has some strict rules about what it takes to make certain meals properly. In the case of spaghetti bolognaise, it is breaking the mince up so that there are no large lumps. And in the case of his ratatouille, it is compulsory to squish the bitter juices out of the brinjals. Every time I tell him I am making ratatouille I know exactly what his next sentence will be: “Have you pressed the aubergines?”

So, before you start, please don’t skip this vital step. My father and I will have nothing to do with bitter, unsquashed eggplants!

Ingredients

  • 1 large aubergine/eggplant/brinjal/whateveryoucallthem or 2-3 smaller ones
  • 1 large green pepper and 1 small red pepper
  • 3 or four courgettes/baby marrows
  • A punnet of button mushrooms
  • 2 onions
  • 1 tin whole peeled tomatos
  • Some tomato paste (not in the Russipe, but I like it)
  • 2-3 cloves of garlic
  • A hefty splash of olive oil
  • Chopped parsley or friend bacon to garnish

What to do

  • Cut the ends off the aubergines and courgettes. Wash and cut them into fairly thick slices. Sprinkle liberally with salt and layer them in a colander over a plate. Squash them down with something heavy (I use a pot filled with water). Leave for at least an hour until all the moisture has been pressed out.
This is my aubergine-squashing contraption. See the brown stuff on the plate? Those are the bitter juices!

This is my aubergine-squashing contraption. See the brown stuff on the plate? Those are the bitter juices!

  • Chop the peppers, onion and garlic and roughly chop the tinned tomatoes.
With all the veggie chopping involved in this recipe, I do sometimes think of getting one of those slicer dicer things you see on TV.

With all the veggie chopping involved in this recipe, I do sometimes think of getting one of those slicer dicer things you see on TV.

  • Heat the oil in a large frying pan and fry the onions and garlic for five minutes over a low heat until transparent.
  • Add the mushrooms and peppers and cook for another 10 minutes, then add the remaining ingredients and season to taste with salt and freshly ground pepper.
  • Cover the pan and simmer over a low heat for at least half an hour, stirring occasionally and correcting the seasoning, until the liquid thickens.

There are a couple of ways you can serve your ratatouille:

As a lovely veggie stew

In which case, simply ‘present on a bed of boiled rice’ (dad’s instructions). This is a great option for dinner parties, especially if any of your guests are vegetarian. For a change, they will not feel left out or second best. If any of your other guests are hardened meat eaters, garnish your ratatouille with bacon. This is sure to amuse.

As a side dish with meat

If you (or your loved ones) prefer meat, it can be tough to make veggies the exciting part of a meal. This ratatouille is just as toothsome and tasty as sirloin and is the perfect way to get vitamins and minerals into recalcitrant carnivores.

IMG_4637_Snapseed

I am a recalcitrant carnivore myself.

Wine pairing suggestion

Vondeling Cabernet Sauvignon/Merlot

IMG_4602_Snapseed

This particular vintage got four stars from Platter, but we managed to get it at a bargain price. (Isn’t buying wine in SA so much fun? You should see the colour my boyfriend’s American friends turn when they drink our wine and then we tell them what it cost.)

The point here is that this is a vegetable stew that deserves to be paired with a wine that you’d normally serve with red meat. The lovely black peppery aromas of this full-bodied red go brilliantly with the simple seasoning of the ratatouille.

Time needed

  • Veggie chopping: 15 minutes
  • Brinjal squashing: 1-2 hours
  • Frying and simmering: 45 minutes

Dishes dirtied

  • 1 chopping board
  • 1 knife
  • 1 colander
  • 1 plate
  • 1 frying pan
  • 1 wooden spoon
1

Recipe #5: The World’s Fluffiest Omelette

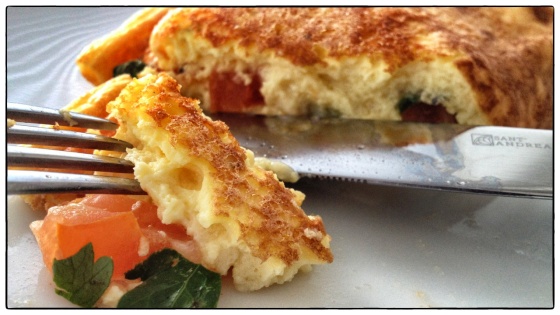
This is no ordinary omelette.

This is no ordinary omelette. This is the Hamley’s teddy bear of omelettes.

Today I’m going to do something I would never ordinarily do. I’m going to complicate a recipe – but just a little bit, and only because the reward is totally worth it.

Have you ever wanted to be known as ‘The Best Something-or-Otherer’? As in, ‘Oh, Alison? Why, yes, she’s the world’s best drunken night-time rollerblader!’ (I believe I was, once, a long time ago.) Well, here is your chance to become known by anyone you come into breakfast-time contact with as the World’s Best and Fluffiest Omelette Maker. From now on, ex-boyfriends (and/or girlfriends) will sigh mournfully over their stodgy eggs and remember the golden, happy days when you served them this…

Wazzuuuup!

Wazzuuuup!

Ingredients

  • 2 eggs
  • Splash of milk/cream/sour cream
  • Knob of butter
  • Salt and pepper
  • Half a tomato
  • A handful of excellent vintage cheddar, grated (Remember – NEVER skimp on cheese!)
  • Some chopped parsley or chives

What to do

There is a slightly tricky skill you’re going to need to achieve World Omelette Domination. You need to be able to separate eggs.

Until recently, I was absolutely convinced that if I got so much as a molecule of egg yellow into my egg white when separating them, the game was up and I would have to start all over again. This resulted in a large number of eggs being scrambled instead of meringued. But fear not! When I told this to a friend recently, she poo-pooed me so vigorously (and Google-proved it to boot) that I actually tested it today (accidentally). I am happy to inform you that egg whites do still beat into proper peaks, even with bits of yellow in them.

So, let’s get started!

  • Turn a plate on your stove to medium and turn on your oven’s grill.
  • Separate your eggs, and don’t despair if you get some yellow in the whites. Beat the whites until they form fairly stiff peaks (secret strategy no. 1) and then add the yolks and some milk, cream or sour cream.

IMG_4606_Snapseed

  • Heat a small frying pan with the knob of butter in it. You want it to be medium hot before you put the egg mixture in.
  • Wait a couple of minutes and then very, very gently, sprinkle the cheese, parsley/chives and tomatos on top of the eggy mousse in the frying pan.

IMG_4609_Snapseed

  • When the underneath is golden brown (lift it up and peek underneath to check) put the pan under the grill (secret strategy no. 2) so that the top gets a little bit cooked too. (Remember not to put the pan handle in the oven, and use an oven glove to take the pan out again.)

IMG_4613_Snapseed

  • Carefully flip one half over with the egg lifter and slide onto a plate.
  • Pause for audience applause.

Time needed

  • Normal omelette: 10 minutes
  • World’s Fluffiest Omelette: 15 minutes

Dishes dirtied

  • 1 chopping board
  • 1 knife
  • 1 frying pan
  • 1 egg lifter
  • 1 bowl
  • Another bowl*
  • A beater*

*Not required for Ordinary Omelettes

To sum up: 5 extra minutes and 2 extra things to wash up. That’s all it takes to become World Omelette Champion!

Wine pairing suggestion

Backsberg Brut MCC

IMG_4620_Snapseed

Unlike scones, omelettes are a manly breakfast, even when they are soft and fluffy. No pink bubbles for this then! The creamy, smooth mousse of the Backsberg MCC will be as frothy as your amazing omelette.